Documentation
From installing to writing a mapping profile. What each feature solves is on the features page.
If you are here because QGIS will not open your DWG, start with why, and three ways around it.
1. Installing
Free edition — in QGIS open
Plugins → Manage and Install Plugins, search for EchoCad
and install it. It is in the official QGIS plugin repository, so updates
arrive through the Plugin Manager as well.
On a machine with no internet, download echocad-<version>.zip from
the releases on a machine that has one, carry it over, and use
Plugins → Manage and Install Plugins → Install from ZIP.
Pro — after you buy, the purchase page shows your licence key and a Download EchoCad Pro (ZIP) button. Install the ZIP with Plugins → Manage and Install Plugins → Install from ZIP, then open Plugins → EchoCad Pro → Licence…, paste the key and press Activate. Updates then arrive through the Plugin Manager. Lost the key? Get it again on the key page with your order number and the email you used. Pro has a different plugin id, so it does not collide with the free edition and updates never overwrite each other.
QGIS 3.34 LTR or newer is required. We have checked 3.44 and 4.x as well.
The interface follows your QGIS language. Ten are included: English, German, Spanish, French, Italian, Japanese, Korean, Polish, Portuguese and Chinese (Simplified). Anything not translated shows in English rather than as a blank.
2. Which files each edition opens
The free edition reads DXF. There is nothing to install and nothing to configure — no converter is fetched, so it behaves the same on a machine with no internet.
Pro reads DWG as well, R14 through 2018 and later, with the converter
already inside it. Nothing to download, no path to set, and it works on an isolated
network. The bundled build is LibreDWG dwg2dxf 0.14.8578; corresponding
source is pointed to in bin/SOURCE.md inside the plugin (it is GPL-3).
If you have a DWG and the free edition, save it as DXF from the CAD you already use and open that. That is two steps; Pro removes them.
R13 and older get a second chance in Pro. Stock LibreDWG decodes such a drawing and then throws the whole thing away, so every tool built on it reports failure. Pro ships a patched converter that keeps what was decoded. Both R12 drawings in our sample set open this way, with layer names, blocks and text intact. Old files vary, though — when recovery fails the message says so, and you can save the drawing as DWG 2018 from the CAD you use (on Windows the free Autodesk DWG TrueView converts it too). The free edition reads DXF only, so this does not apply there.
3. Menus
After installing, entries appear under the Plugins menu. The free edition is EchoCad and Pro is EchoCad Pro, so you can tell at a glance which one you are using.
Pro also registers with Processing.
4. The import window
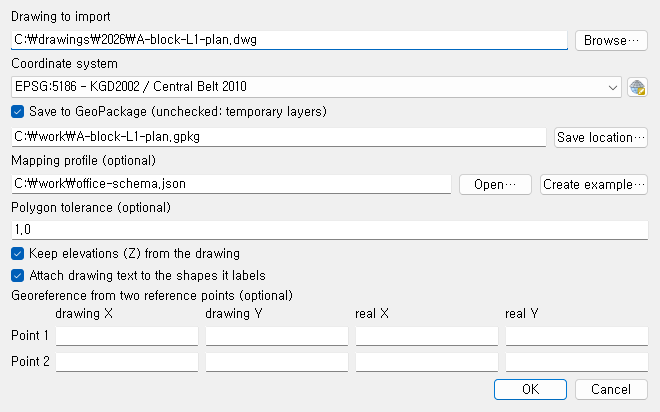
- Drawing to import — choose the DWG file.
- Coordinate system — filled in from the project when the window opens. You are usually adding to data that already exists, so the same system is the right one. Change it freely; if the project has no coordinate system you have to set one before the import will run.
- Layers — tick to skip layers that are switched off or frozen in the drawing.
- Layer names (Pro) — As in the drawing, or rules you saved. Edit… opens a window where you put CAD layers under new names. See section 5.
- Advanced options (Pro) — polygon tolerance in mm, keep elevations (Z),
and put text inside a shape into that shape's
labelattribute.
Imported layers are temporary until you save or export them from QGIS. After the import a report shows what came in and what did not, with the reason for each.
Block attributes are extracted automatically in Pro. There is no switch for it in this window. To turn it off, use the Extract block attributes into fields option of the Processing algorithm.
5. Layer name rules (Pro)
Edit… lists the drawing's CAD layers. Make a new name, put layers under it, untick the ones you do not want, and save the rules under a name. They then appear in the Layer names list for the next drawing. Rules are stored as a JSON file in the shape below; Open a rules file… in the same list loads one a colleague shared, and the Processing algorithms take the same file.
{
  "version": 1,
  "name": "example",
  "description": "match is a glob pattern. The first rule that matches wins.",
  "rules": [
    { "match": "A-WALL-*", "layer_name": "building_wall", "geometry": "polygon" },
    { "match": "*-TEXT",   "layer_name": "annotation",    "geometry": "point"   }
  ],
  "default": { "layer_name": "{cad_layer}", "geometry": "auto" }
}Rule order is priority. Matching stops at the first hit, so put narrow patterns first. It is a single JSON file, so a team can share it and keep it in git.
6. When something goes wrong
Questions about using EchoCad, free or Pro: ask on GitHub Discussions, where the answer helps the next person too. Licence keys, billing, or a problem you can only show with your own drawings: Pro support (private).
A failed import tells you which kind of failure it was.
| Message | Meaning |
|---|---|
| Unsupported drawing format | R13 or older, and recovery did not succeed on this one |
| Conversion timed out | The drawing is very large, or damaged |
| There is nothing to draw | It converted but holds no entities. Possibly a metadata-only drawing |
| Conversion stopped part way | The converter halted mid-write. Check the converter version |
7. Known limits
- Hatch patterns are rebuilt from the definitions the drawing carries. Patterns made of parallel line families (angle, spacing, dashes) come out as they are. Patterns built from dots or filled shapes cannot be expressed as lines and fall back to a solid fill — we do not invent one.
- External references (XREF) whose target file is missing are skipped. The import still finishes, and the missing file names are listed in the result.
- Features with broken coordinates are dropped. Some drawings carry a few entities at absurd coordinates (1014 and beyond) that would otherwise render the whole drawing as an empty page. The number dropped is reported.
- Line weight is applied only where the drawing specifies it. Many drawings leave it at "default".